THE
THING
|
|


|

______________________________________________________________________________________
" YOU ARE TERMINATED! "
That is the phrase that came to mind when I first saw this Big Bad Boy of a kit. I admit I am a huge fan of all things terminator.. movies, TV shows, comic books, and yes especially model kits. This version produced by Mad Dog Resin and sculpted by Mike Baldwin. This 1/6 scale killing machine is based on the muscular Dark Horse comic "terminator the enemy within" #2 cover art by Simon Bisley. Mikey B. handles the exaggerated muscular torso and two fisted assault weapon toting pose very nicely. He extrapolates the lower torso and skull-riddled base with dramatic ease. The building of this kit was straight forward and simple. The kit came in eight solid cast white resin parts. All the body parts have male/female locking points which is always a nice touch. Locking points are very helpful to folks new to the hobby and resin kit building. The kit has a ton of great sculpted detail which includes a very cool stylized endo skeletal face, masses of exposed sinewy battle damaged flesh, several obvious bullet hits, and various other gouges of torn away skin. The kit has just enough exposed skeleton to imply the Terminator has been out there a while but not so long that all his organic suit has been blown away. After 15 minutes of minor sanding, gluing, assembly, and light seam filling at the shoulders, waist area and where the boots attach to the base, I was good to go for priming. I used Krylon sandable auto primer. In this case I used the white primer and let the kit sit over a few hours to allow the primer to cure properly. If you are in a hurry, you can start laying down your base coat within 1/2 hour of priming. On to painting. I had seen a few version of this kit painted up in the standard Caucasian flesh tones. While these paint jobs were very nicely done, I wanted to try a paint them that was somewhat different. It seems to me that not all terminators would be pink-skinned Caucasians in the hypothetical apocalyptic future. For this project I decided to go with more ethnic darker tone to the skin. I considered that darker flesh tones would create more contrast against the exposed silver endoskeleton and would pop visually. The main reason is because no one else had done it yet (that I am aware of). I have a basic recipe that I follow for ethnic skin which covers the varying tones of persons of African, Asian, India, and South American origins. I use a combination of Burnt umber, Burnt sienna, and Raw umber. There a few methods of laying in colors, lightest color as the base coat with darker shadows laid in after, or darkest colors as a base coat with hi-lights airbrushed on and built up in the highest points. In this case I started with a burnt sienna base coat using my Badger Sotar 20/20. I got all the skin areas covered then a quick misting of Testor's dull coat between stages. I ran windshield washing fluid through the brush twice for a good clear out and used burnt sienna in between all the muscles. This slowly built up the shadows all around the body. Once this was accomplished, I loaded up the airbrush with raw umber. With a very low compression, I carefully touched on all the muscle peaks and highest raised areas on all the skin. At this point I turned up the air pressure a bit and stood about two feet from the kit and gave him an all over very light misting of the raw umber color to begin blending the previous work together. The airbrushing portion of the build up is basically finished so I gave him a good couple sprays all around with dull coat. Shaping up..... At this point I gave the hair, boots, both weapons (the fire arm in his left hand kept separate for painting and will be glued into place once the kit is complete), and all the visible endoskeleton parts a brush coating of black. I also blocked in the torn pants with medium green. I used a heat gun to help dry the black and green a bit faster. If you use a heat gun instead of a hairdryer to speedup paint dry time, do take care not to burn your kit. Once dry I brought out my chalk pastels for a bit of added "spot shading". When shading with pastels I use an 80 grit sandpaper to create the powder. I ground a bit of black and brown pastel and touched up in all the muscle grooves of the chest and stomach area. Then I did a general once over the whole body with the pastels including the nipples to insure all the shading was in place. Dull coat seal. Mixing a brown and red pastel, I touched up lightly here and there on the big guys muscles just to add a hint warmth to the skin tone. Now, I seal the entire kit with a light coat of Krylon crystal clear. This does not give the kit a wet look, but offers a nice sheen as well as a nice durable finish. I proceed to give the pants a dirty black wash and also dry brush the hair and boots with burnt umber. Originally I intended to paint both weapons with a black matt weathered finish, instead I went the silver and blue metallic finish for a more futuristic weapon feel. The left handed gun I dry brushed in blue metallic and then silver over that for a more aged appearance. The right hand gun was dry brushed in straight silver, given a black wash then silver dry brush a second time. The grips on both firearms and the ammo mag were left black and "chipped" with silver. All looking well, I silver dry brushed all the exposed endoskeleton areas, gave them a black wash and again a second silver dry brush. The endo skeleton eyes were left silver dry brushed with inner center touched up with Freakflex clear red. To draw the eye to the furrowed brows of the face I added a black "spot wash" shadow to them. For the wounds, I took a pale pink and brushed it only on all the large areas with exposed sinew and deep tissue damage. This covers the left knee, left elbow, left deltoid, right triceps and the large area on the back. Then using Freakflex transparent tints I made a mix of two parts red and one part brown tint and carefully applied it to all the pink painted areas taking care not to cover the silver with too much of the bloody color. Then I went around the entire kit with the blood and covered all the wounds large and small. Dabbing strategically around the area where his human skin face was torn away and down around the neck wound. While the blood coat was drying I painted in the belt, buckle and finished the boot detail with a light dry brushing of tan. To finish up the blood work I spotted in a bit more of the red mixture into the heavy damage areas and used a toothbrush dipped in the red/brown I flicked it making a "spattered" effect on the shoulder and leg. Once dry I went back in with Future floor polish and coated all the blood areas that were to have a freshly wet look. As for the base, I gave it a brush coat of raw umber, then a burnt umber wash and black spot washes here and there. Once dry I laid on a raw umber dry brush. I the skulls to have a somewhat bleached bone look. For this I washed the skulls with a light cream, spot washed a medium brown in the temples, eye sockets and nose area. Finally a burnt umber wash over all the skulls and on the ground around them. I dabbed the tops of the skulls dry at their highest points. To complete the project I added Future floor wax all around the skulls on the base for a wet ground look and a toothbrush speckling of burnt sienna on the boots for a muddy effect. |


|
______________________________________________________________________________________
|
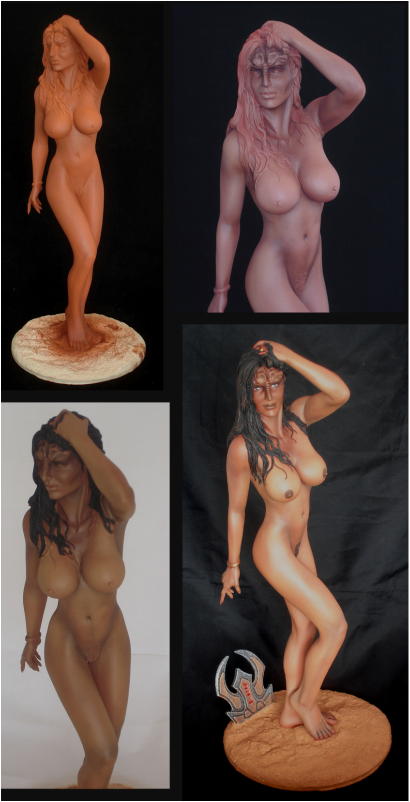
KLINGON EMPRESS
In this article I would like to profile for a kit bash the "Sex on the beach" Sandy 1/4 scale resin kit produced by Lunatic Fringe and sculpted by Steve West.
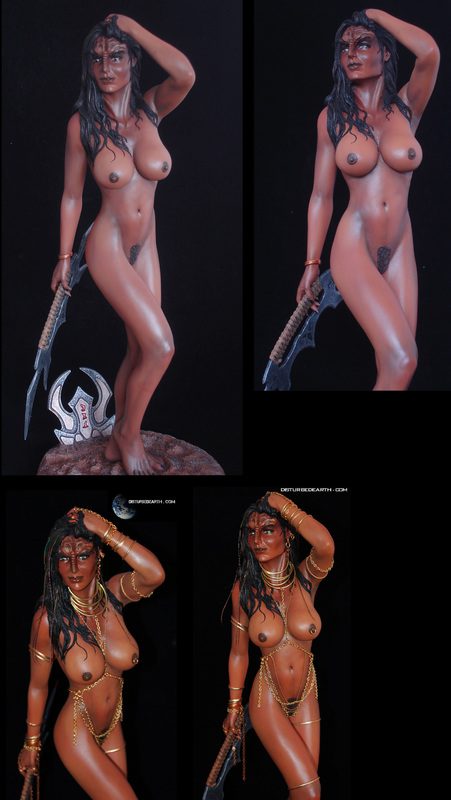
The idea for this type of kit conversion came to me a few years ago when I happened across a (Bat'leth) Sword of Kahless pewter letter opener. For those of your who aren't trekker geeks, the weapon is a Klingon battle sword from episodes of Star Trek TNG and DS9. As soon as I saw the blade I knew that it was destined to be part of a diorama of some kind. The problem was and remains, there are virtually no figure kits of Klingons, and certainly not in the scale to suit a 10" Bat'leth. So my search was on to find the right kit to place with the blade. I soon realized the only way would have to be a kit bash of a 1/4 scale kit. So I filed the idea on the back burner until a solution presented itself, and present itself it did. When I first saw the Sandy kit I knew it was the one I had been looking for. The sculpt was right, the scale was right and the attitude and subject was perfect. What could be better than a nude female Klingon warrior? For starters the kit right from the box is pretty darn cool. Great box art, concise instruction sheet and a certificate of authenticity ( this kit is # 084 for those interested). The kit was nicely cast in four off-white colored resin parts which consist of the main body, two arms and the base. I went through the standard steps of resin kit prep by sanding and washing all the parts in a warm soapy water solution to remove any oils or residue. I generally do the sanding first then wash all the parts after. The assembly of the kit was a breeze. Some minor putty seam filling where the feet attach to the base and on the left arm where it connects at the shoulder and hand to the hair. The right arms seam is hidden by the flowing hair detail (I love that). At this stage I realized that her stripped off bikini sculpted on the base was going to be needed here so I ground it away using my handy dremel tool. Now I was ready to handle the only real converting with the kit. That's sculpting the trademark Klingon forehead. I mixed up a small amount of Aves putty and went to shaping. In the Star Trek universe the ridges on every Klingon forehead is different according to family traits thus artistically unique to the viewer. In any case I found a few random female Klingon head references that I liked and went to it making sure I went down the bridge of the nose to complete the illusion of bone structure underneath the skin. Once I was satisfied with the look of the head I gave her a quick dusting of Krylon white primer and let her rest overnight to give the putty work and primer a good drying time. Returning to her the next morning, I gave her a once over and then a fast sanding all around with a light grit sanding sponge. Now on to painting this Babe. Klingons have a decidedly darker flesh tone than the average Caucasian character on the show so I did a bit more referencing and settled on a deep African American tone but with green eyes (It's a hot look). I have used a variety of tones to paint African flesh tones but my favorite formula is Burnt umber, Burnt sienna and Raw umber. Among other colors, I keep these as Master colors already thinned and airbrush ready in 4oz baby food jars. (Here's a tip for you on paint stored in jars or otherwise screw on lids) To get the lid on stored paint to never stick or get cruddy with dried paint, never shake the container to mix the paint before opening. Always remove the lid, then stir the paint to mix and rinse the lid clean before resealing. For this demo I'm going medium color to lightest color, to darkest shadows. So I load up my Badger Sotar 20/20 with Burnt sienna and give her the first round. I go with several light coats to give her nice coverage then seal in between with dull coat. Darned if I'm a lacquer sealing fool after every single step. I follow this step with Raw umber, also in several light coverage coats and seal. Now to cut in deeper shadows with the burnt umber, I break out my newest brush, the badger Renegade Velocity detailing airbrush. I used the chocolate colored burnt umber and go all around the recessed areas. The forehead of course, the knees, under the arms, in between the breasts and the toes, I even made her look like she had some abs going on. After the flat sealer I blocked in the hair with flat black so I could gauge the color contrast, after which I warmed her skin up a bit by adding some red oxide to the raw umber and misting her lightly from top to bottom. To give her and even darker Klingon look I mixed pastel powders, so ground down some black and brown chalk and mixed for application. I used the pastel around the feet, hands and around the hairline to lay in subtle natural looking shadows. Now for some detail work now by painting the nipples, facial details, pubic area and nails. As for the Bat'leth, it was sprayed with Krylon gray primer and hand brush painted in flat black. To detail it, I gave it a gun metal dry brush then sealed, and a final light silver dry brush. I also painted her bracelet and rind in bronze and topped of the bracelet jewel in metallic blue. The wrapped leather handle was hand brushed with light tan and darkened with the same black/brown pastel used previously to shade the skin. I sealed the skin with a few light coats of Krylon crystal clear. The crystal clear gives the skin a nice sheen ties all the shading together. The blade was then sealed and simply hot glued into her hand hanging down in a casual pose. The whole scene was coming together nicely in my mind but the base seemed a bit empty. I went on a search online for some severed heads in the same or similar scale I could add as her previous defeated opponents, but sadly I couldn't track any down on short notice. What I settled for was plastic lapel insignia used for Klingon costume uniforms. It came already painted to I repainted it in gold and silver and glued it to the base and used Aves putty to build up the ground around it to simulate ritual ruin of sorts. The base itself was hand brushed with raw umber. Once try it was given a wash of burnt umber, then black washes were spotted here and there for added staining. To round out the figures new Klingon look, I snipped a few pieces of black doll mohair and glued then into place as her eyebrows. Once these were set and dry I brush dabbed the area with a bit of bottled flat finish to take the out the shine the super glue left. The final painting steps were to dry brush the hair in burnt umber for a very subtle hi-light from it's black basecoat and dry brush the final hi-lights on the base with a raw umber and white mixture to grab back all the hi-lights. Lastly I gave the eyes, fingernails and lips a coat of model master clear coat for the wet look she needed to complete sensuality of the kit. I really can't say enough about recommending the Sandy kit. During the process I found myself considering all the other possibilities here for converting. Wonder woman, Elvira, a sensual zombie. The natural of this kit can be applied to any number of imaginative themes. |


|
